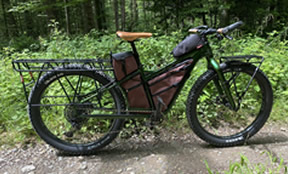
Divide on a Salsa Blackborow (Switzerland).

Avantum Brands SL imports Old Man Mountain racks to the EU since 2005. We ship all over Europe.
![]()
This rack is eyelet-mount ready out of the box. If your bike does not have upper and lower eyelets, we offer a full-line of Fit Kits for thru axles or QR skewers. Mounting the rack via thru axle or QR skewer will also increase the load capacity of the rack to 31 kg.
Don’t forget to apply anti-seize (preferred) or grease to all bolts. This will prevent the bolts from seizing and making it hard to remove the bolts down later on. We do use Nyloc nuts where needed to prevent bolts from loosening on their own.
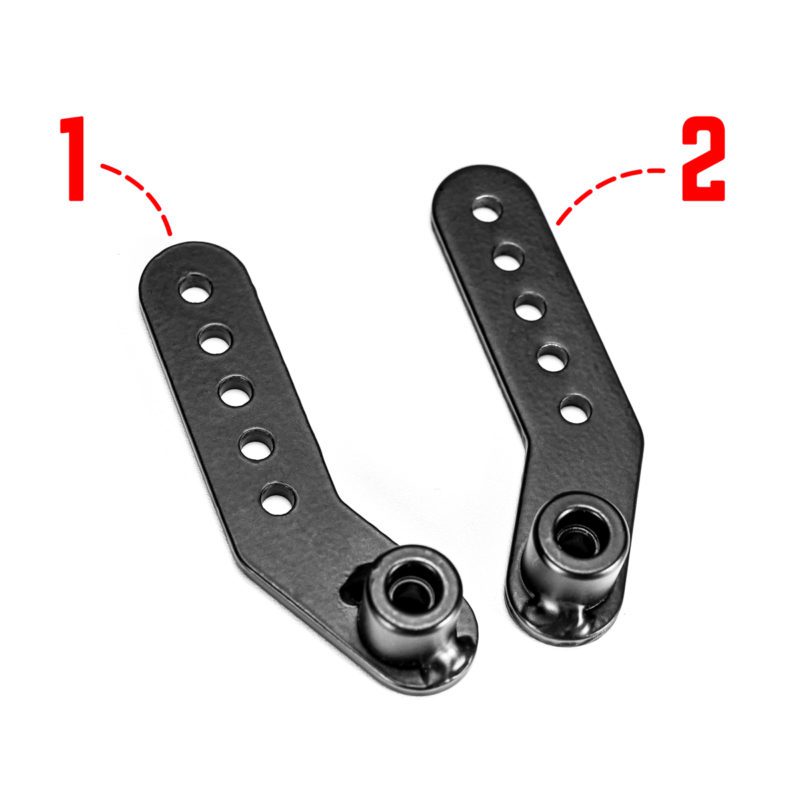
- Arrange the dropouts as seen in Image C to identify dropout #1 and #2.

- Using Hardware Kit 1, install Dropout #2 on the inner, left side of the rack frame with the bolt collar pointing out. See image D.
Some wider frames may require the dropouts to be mounted to the outside of the rack frame.
1. If you are going to QR Skewer mount your rack you fill want to follow the front rack instructions for attaching your rack dropouts.
2. If you find that for reasons of axle length you need to install the Dropouts to the outside of the frame legs, please go ahead and do so.
- Install the bolts pointing in towards the middle of the rack with the bolt heads on the outside. Be sure to align the dropout with the Rack Tabs. See Image F.
- Repeat the above steps with dropout #1.
- Using Hardware Kit 1, install Dropout #1 on the inner, left side of the rack frame with the bolt collar pointing in. See Image C. Use Image H as a starting point to set your rack height to your tire size. Rack height will vary when eyelet mounting as eyelet placement varies from bike to bike. Don’t forget to apply anti-seize (preferred) or grease to all bolts.
- Install the bolts pointing in towards the middle of the rack with the bolt heads on the outside. Be sure to align the dropout with the Rack Tabs. See Image I.
- Repeat the above steps with dropout #2.
- Place the provided 19mm spacer into your racks dropouts then align with your bike’s eyelets.
- Attach your rack Dropouts to the lower eyelets on your bike using Hardware Kit 3. Don’t forget to apply anti-seize (preferred) or grease to all bolts.
- When installed on the on the rear of the bike the Old Man Mountain stamp will be readable from the drive side of the bike. When installed as a front rack the Old Man Mountain stamp will be readable from the non-drive side of the bike.
1. The rack can be installed facing the other direction if desired. This can bring the carried weight closer to the center of the bike but can cause interference with riders’ heels when pedaling or with the seat, especially with dropper posts.
2. If your bike does not have lower eyelets, we offer Fit Kits to mount your rack via thru axle or quick release.
- Remove your bike’s stock thru axle.
Setup your thru axle to match your stock thru axle:
- Compare your stock thru axle to the thru axle provided in your Fit Kit to verify they match. The axles’ thread pitch should match (Image J) and the shaft length should be within +/- 2 mm. Use enclosed spacers as needed to match the length and taper of your stock axle. See Image K.

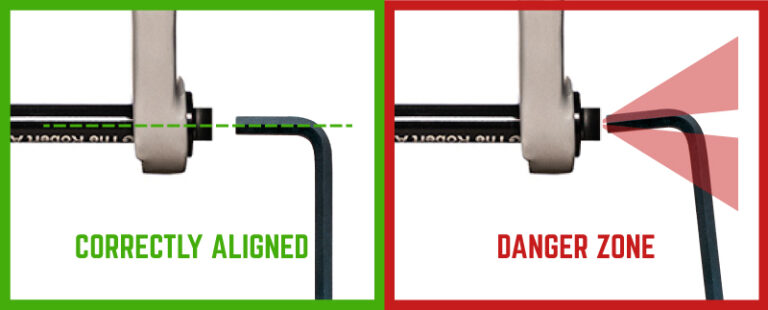
FRIENDLY REMINDER: Be sure to always keep your hex tools aligned with the hex broach. Inserting and torquing tools at an angle can damage tools and parts.
1. When installed on the on the rear of the bike the Old Man Mountain stamp will be readable from the drive side of the bike. When installed as a front rack the Old Man Mountain stamp will be readable from the non-drive side of the bike.
2. The rack can be installed facing the other direction if desired. This can bring the carried weight closer to the center of the bike but can cause interference with riders’ heels when pedaling or with the seat, especially with dropper posts.
Check that your bike and rack are level. See Image L. Use Hardware Kit 5 to secure the rack to the axle. Snug up the hardware for now, we will torque all bolts at the end.
- Remove your stock skewer from your bike, keeping your wheel in place.
-
Place your OMM rack on your bike and install the OMM QR Skewer through the rack Dropouts and your hub.
1. When installed on the on the rear of the bike the Old Man Mountain stamp will be readable from the drive side of the bike. When installed as a front rack the Old Man Mountain stamp will be readable from the non-drive side of the bike.-Check that your bike and rack are level, and snug up the hardware to hold the rack in place while completing the next steps. See Image L.
2. The rack can be installed facing the other direction if desired. This can bring the carried weight closer to the center of the bike but can cause interference with riders’ heels when pedaling or with the seat, especially with dropper posts.
- If installing the rack on the front grab the 6-inch extenders.
-
If installing the rack on the rear you will use the 14-inch extenders. Attach the Extenders to the upper eyelets on your bike’s seat stays or fork using Hardware Kit 3. On some bikes, bending the Extenders is necessary to properly line up the extenders with the eyelets and/or the inside of the rack’s crossbars. Don’t forget to apply anti-seize (preferred) or grease to all bolts.
If bending the Extenders, we like to wrap them in a paper towel to protect the finish, and bend them in a vise to get nice, clean bends. If you don’t have a vice, your hands can also get the job done.- Use Hardware Kit 2 to attach the slotted end of the Extenders to the inside of the crossbars on the rack frame. Snug them up, but do not torque them yet. Don’t forget to apply anti-seize (preferred) or grease to all bolts.
Another note. If you find your bike does not have upper eyelets, we have a seat post clamp mount or our Pucks which provide upper attachment points on any bike.
Use the Pucks provided with your Fit Kit to attach the Extenders to your fork or seat stays.
- Locate where you want to install the Pucks onto your fork or seatstay, and install the clear protective tape from Hardware Kit 6 to those areas. We suggest mounting the Pucks so the top is aligned with where the tire meets the rim or above. Mounting the pucks lower on the stays will put more strain on your bike’s seat stays.
NOTE: You will want to trim the tape so that it will not overlap BEFORE sticking it to your bike.
- Install the Pucks to your fork or seat stays using our special ZipTies. The Puck should be oriented so the hex shaped pocket faces the wheel. The pucks will settle into place on the first ride so we recommend placing them at the top of the protective tape.
PRO TIP: Running the ZipTies under hot tap water will soften them and help them conform to the shape of your seat stays.
- Pull ZipTies tight with a pair of pilers. Do not cut yet. Be sure to use the supplied ZipTies, they are far stronger than standard ZipTies, are UV stable, and do not ratchet so they can snug up as tightly as possible.
- If installing the rack on the front grab the 6-inch extenders.
- If installing the rack on the rear you will use the 14-inch extenders.
- Attach the Extenders to the pucks. On some bikes, bending the Extenders is necessary to properly line up the extenders with the eyelets and/or the inside of the rack’s crossbars.
PRO TIP: If bending the Extenders, we like to wrap them in a paper towel to protect the finish, and bend them in a vise to get nice, clean bends. If you don’t have a vice, your hands can also get the job done.
-
Use Hardware Kit 2 to attach the slotted end of the Extenders to the inside of the crossbars on the rack frame. Snug them up, but do not torque them yet. Don’t forget to apply anti-seize (preferred) or grease to all bolts.
-
Check again to make sure rack is level and adjust the extenders as necessary.
Tighten up all the hardware to the following specifications.
We are always happy to see how the rack looks when mounted on Your bike. So if you feel like it, please send us a picture of the rack and your bike.
This will also help other customers visualize how the rack will work for them on their bikes.
Divide | Divide Fat | Elkhorn | Pizza Rack | Order Old Man Mountain

Our racks are compatible with full suspension bikes with 26" 700 27.5 and 29" wheels. The best option if you want to carry panniers on your bike.
OMM racks are compatible with disc brakes and 29" wheels. We solve your problem of carrying a load on your mountain bike. The best choice for your bike.
We offer a solution for your 12" axle bike from most mayor brands. For example, Specialized, Cannondale, Trek, Canyon, Cube, Radon, Scott, Giant and Ghost.
Our new Elkhorn rack is perfect for Bikepacking. It is front or rear ready with optional fit kits for axle mounting. The Elkhorn comes in two sizes, Short and Tall.
The structure of the frame is wider and adapts perfectly to the Fat Bikes of Pugsley, Moonlander, Specialized Fatboy, Mondraker Panzer, Trek Farley and many other models... both front and back.
Front QR15 is the front rack you need if you have a QR15 front fork from Fox or Rockshox. As you can see, you can carry load up front as well.